Character Devices, GPIOs and IRQs
Slides: here
Theory
Character Devices
The functionalities we are implementing in the kernel in the form of drivers
can be accessed from userspace through device files and their associated
file operations: open, read, write, ioctl, close, which
translate to system calls. These files can be found in the /dev directory.
There are two types of device files: character and block. Character devices are preferred when data transfer is sequential and small (compared to bulk transfers). For block devices, the communication via system calls has to go through the file and block device subsystems.
To check whether a file is a character device file or a block device file, you can use the file(1) command:
$ file -L /dev/tty0
/dev/tty0: character special (4/0)
$ file -L /dev/tty1
/dev/tty1: character special (4/1)
$ file -L /dev/cdrom
/dev/cdrom: block special (11/0)
Each device file has a major and a minor number assigned to it. The major identifies the device type, while the minor identifies the device number within that device class. In the commands run above, we can see that /dev/tty0 has major 4 and minor 0, while /dev/tty1 has major 4 and minor 1.
Today we will focus on character devices, as they provide the functionality we need. So, how do we expose our module’s functionality as a character device in userspace?
First, let’s think about the syscalls, or more explicitly, the file
operations. We need to implement these first, because they are the
communication channel we have with the userspace. Character devices use
the struct file_operations structure for this purpose:
/* snippet taken from include/linux/fs.h */

struct file_operations {
    struct module *owner;
    loff_t (*llseek) (struct file *, loff_t, int);
    ssize_t (*read) (struct file *, char __user *, size_t, loff_t *);
    ssize_t (*write) (struct file *, const char __user *, size_t, loff_t *);
    [...]
    long (*unlocked_ioctl) (struct file *, unsigned int, unsigned long);
    [...]
    int (*open) (struct inode *, struct file *);
    int (*flush) (struct file *, fl_owner_t id);
    int (*release) (struct inode *, struct file *);
    [...]
One thing to notice is that the signature of the methods does not
match the one they have in userspace. The meaning of struct file and
struct inode will be explained in the next section, but for now, observe
that only open and release take an inode as argument.
After implementing a subset of these file operations, we can register the character device. During this step, the major and the minor of the device are generated. The API for registering/unregistering character devices is:
/* snippet taken from include/linux/fs.h */

int register_chrdev(unsigned int major, const char *name, const struct file_operations *fops);
void unregister_chrdev(unsigned int major, const char *name);

int register_chrdev_region(dev_t first, unsigned int count, char *name);
void unregister_chrdev_region(dev_t first, unsigned int count);

/* wrapper over register_chrdev_region */
int alloc_chrdev_region(dev_t *dev, unsigned baseminor, unsigned count, const char *name);
As you can see, register_chrdev takes the major, a unique name and the file
operations. If you pass 0 as the major, a valid major is assigned automatically
and returned by the method.
register_chrdev_region can be used to register multiple devices of the same
type. Notice how here there are no file operations passed to the
function. If using this, the character devices need to be initialized using
cdev_init and cdev_add:
/* snippet taken from include/linux/cdev.h */

void cdev_init(struct cdev *cdev, struct file_operations *fops);
int cdev_add(struct cdev *dev, dev_t num, unsigned int count);
void cdev_del(struct cdev *dev);
struct cdev is the kernel representation of a character device.
After this step, we have a character device but, if you look into /dev,
there is no device file. There are (at least) two ways to create the associated
file:
using
mknodin userspace (you have to know the major of your device)
Note
See mknod(1) for usage.
using
device_createandclass_create.class_createcreates a device class in sysfs (/sys/class), that will then be passed todevice_create.device_createtakes the class, the major and minor of the char device, and the name of the file in/dev.
/* snippet taken from include/linux/device/class.h */

struct class *class_create(const char *name);
void class_destroy(const struct class *cls);

[...]

/* snippet taken from include/linux/device.h */

struct device * device_create(const struct class *cls, struct device *parent, dev_t devt, void *drvdata, const char *fmt, ...);
void device_destroy(const struct class *cls, dev_t devt);
Key takeaway - order of operations:
register/alloc chrdev/region
if using regions -> use cdev_init() + cdev_add(), otherwise skip this step
class_create() + device_create() OR mknod in userspace
File representation in the kernel
Let’s get back to struct inode and struct file. The inclusion rule is
that the struct file contains a pointer to a struct inode. The inode
contains the metadata of the file (think size, permissions, major, minor, etc.).
It can also contain a pointer to the associated character device. In userspace,
you can access this metadata using stat:
$ stat /dev/tty0
File: /dev/tty0
Size: 0         Blocks: 0          IO Block: 4096   character special file
Device: 0,6     Inode: 14          Links: 1     Device type: 4,0
Access: (0620/crw--w----)  Uid: (    0/    root)   Gid: (    5/     tty)
Access: 2026-06-08 10:12:46.856634157 +0300
Modify: 2026-06-08 10:13:42.000000000 +0300
Change: 2026-06-08 10:12:46.856634157 +0300
Birth: 2026-06-08 10:12:29.140999999 +0300
If you take a look in struct inode, you will see that it contains struct
inode_operations *i_ops. Among them there is mknod, which, as we have seen
in the previous section, can be used to create the file associated with the
char device in userspace.
/* snippet taken from include/linux/fs.h */

struct inode {
       umode_t               i_mode;
       unsigned short        i_opflags;
       unsigned int          i_flags;
#ifdef CONFIG_FS_POSIX_ACL
       struct posix_acl      *i_acl;
       struct posix_acl      *i_default_acl;
#endif
       kuid_t                i_uid;
       kgid_t                i_gid;

       const struct inode_operations *i_op;
       struct super_block    *i_sb;
       struct address_space  *i_mapping;

#ifdef CONFIG_SECURITY
       void                  *i_security;
#endif
[...]
};
The file structure is created when the file, that is already on the disk and
has an inode, is opened. The struct file contains the file path, file opening
flags, the position within the file, the file operations, the inode, etc.
Thus, we can have two struct file that point to the same struct inode,
meaning we opened that file twice. This is why only open and release
take a struct inode as argument, and the rest of the file operations
directly use the struct file to access what they might need.
Note
Please refer to include/linux/fs.h for the complete structures.
Misc device
Character devices are complex and, as you have seen, come with a wide variety of methods that can be used for registering/allocating. Fortunately, if you don’t need the full-fledged functionality of character devices, you can use miscellaneous devices, which are a subset of that. All miscellaneous devices have a fixed major (10) and the minor can be assigned dynamically at runtime.
Similar to character devices, you will need to implement the file operations. Then, you will need to define a misc device as follows:
static struct miscdevice misc_dev = {
     .minor = MISC_DYNAMIC_MINOR,
     .name  = "misc0",
     .fops  = &fops,
};
Registering/unregistering is done with the following API:
/* snippet from include/linux/miscdevice.h */

int misc_register(struct miscdevice *misc);
void misc_deregister(struct miscdevice *misc);
misc_register takes care of allocating the device, registering it,
and creating the file node for it in /dev.
Accessing userspace memory
As you know, Linux is split in kernel space and user space. Interaction with the
device node (/dev/<char_device>) happens in user space, and the data has to
eventually reach our module in kernel space. Directly dereferencing pointers
from userspace is usually a bad idea, as the memory is mapped differently in
user space vs kernel space. How do we pass data, then?
The answer is that there is an API that manages that data for us:
/* snippet taken from include/asm/uaccess.h */

put_user(type val, type *address);
get_user(type val, type *address);
unsigned long copy_to_user(void __user *to, const void *from, unsigned long n);
unsigned long copy_from_user(void *to, const void __user *from, unsigned long n);
As their name suggests, copy_to_user and copy_from_user copy data
to/from buffers in user space and kernel space. There are also variants of
these methods that deal with structures directly. put_user and get_user
do what their name suggests: putting/getting a value to/from an userspace
address.
Lists in the Linux kernel
As you already know, data structures can make your life easier if used right. Lists are a good starting point and a very good foundation for how other data structures work in the Linux kernel.
Lists in the Linux kernel are circular, doubly-linked lists. One such list is composed of at least one node, called a head. A list node contains pointers to the previous and next nodes.
/* snippet taken from include/linux/types.h */

struct list_head {
    struct list_head *next, *prev;
};
To create and populate the initial list head, you can use LIST_HEAD(list),
where list will be a struct list_head. This will make the node point to
itself. For dynamically allocating it, use INIT_LIST_HEAD. The list API is
as follows (non-exhaustive):
/* snippet taken from include/linux/list.h */

list_add(struct list_head *new, struct list_head *head)
list_del(struct list_head *entry)
list_entry(ptr, type, member)
list_for_each(pos, head)
list_for_each_safe(pos, n, head)
But where is the data? For now we have only seen the prev and next pointers
in a node. Well, the list API actually only takes struct list_head as
arguments, but these list nodes are encapsulated in structures, that contain
that data. For example:
struct my_node {
     u32 data;
     struct list_head list;
};
This means that it is up to the user to allocate and free this memory.
What are GPIOs? gpiod API
GPIO stands for General Purpose Input/Output. In short, these are digital pins that can have two base states: 0 or 1, and this can be in one of two directions: input or output. As you might know, there is a transition state between 0->1 called the rising edge, and another on 1->0 called a falling edge. These are good to know terms and will be relevant in the next section.
To be able to manipulate its direction and values, you need to get a hold of a
GPIO descriptor (struct gpio_desc). This can be done through the gpiod_
API: gpiod_get and other similar methods. To get/set its value, you can use
gpiod_get_value and gpiod_set_value which take the previously obtained
descriptor as an argument.
The header file with these methods can be found in include/linux/gpio/consumer.h.
What are interrupts and why are they useful?
Let’s imagine for a second that we have a single-core CPU, so no way to parallelize anything. We have to do work and also respond to events with this limited resource that we have. Events are usually happening pretty rarely with respect to the CPU frequency. Examples might include keyboard/mouse input. How do we handle those?
Polling refers to (busy-)waiting for an event to happen and blocking the thread with this single operation of checking if a flag is true.
while (button_is_not_pressed) { /* do nothing */ }
While polling has its usecases (which are not the scope of this lab), a (usually) better way to handle events is by using interrupts. Interrupts require hardware support to be able to exist, as they are signals triggered in the hardware and (usually) distributed by an interrupt controller [1]. They interrupt the current program context and trigger a switch to what is called an interrupt context, which should handle an event as fast as possible and return to the normal program flow.
For example, in the context of GPIO, an interrupt can mean a button press turning an input GPIO from 1 to 0. This change in value (falling edge), triggers an interrupt and notifies the kernel that this happened so that it can take care of it.
Using the kernel API, the way to handle interrupts coming from GPIOs is to:
First get the irq number tied to that GPIO:
gpiod_to_irqRegister an irq handler to that irq number and set when you want that to be triggered (IRQF_TRIGGER_RISING, IRQF_TRIGGER_FALLING, etc.):
request_irq.
Now, when a button press happens, the program will jump to that handler.
Note
An irq handler is a method within the program. It has to try to return as fast as possible, because, while in interrupt context, no other interrupts can be handled (all irqs are masked [2]), so you might lose other events happening.
Device managed API
To avoid memory leaks upon driver detach, you can use the devres, or
device-managed, API. For some of the methods that we have already seen,
there exist devm_-prefixed methods that automatically free the resources
upon driver removal.
Some examples of managed methods that can be used in this lab:
devm_gpiod_get()
devm_gpiod_get_index()
devm_gpiod_get_array()
devm_request_irq()
Note
To learn more, read the dedicated page here.
Button debouncing
Using buttons usually comes with a phenomenon called signal bouncing. In our case, since the buttons use pull-up resistors and are registered as pressed on the falling edge of the signal, things might look like this:
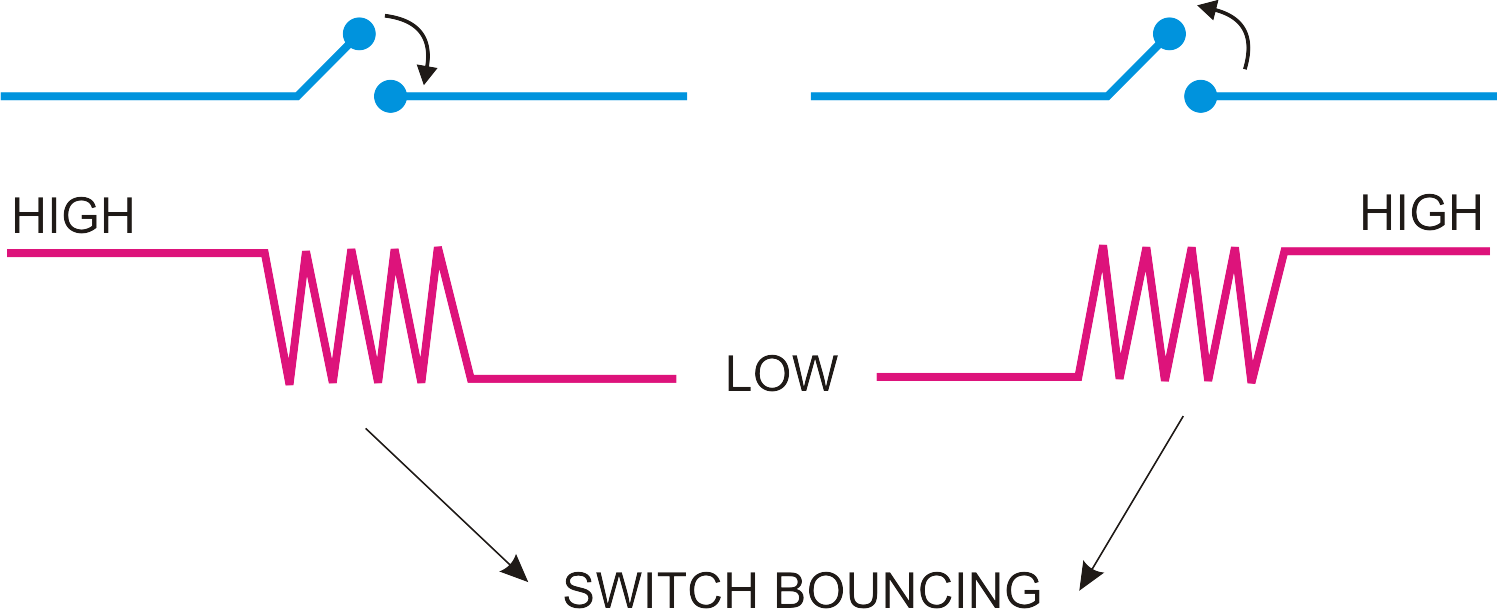
That jitter on the the signal is what produces the rapid succession of interrupts. To mitigate this, we can do software button debouncing (and yes, debouncing can also be done in the hardware). This is nothing complicated, the main idea is that we need to ignore interrupts happening too close to the last one by setting some kind of timeout, which is usually a few hundred miliseconds. This timeout depends on the button, so it is best to try multiple values. If you set the timeout too large, the button responsiveness will drop.
Lab exercises
Note
Exercises for this lab can be found in drivers/lkss/lab2.
Prerequisites
Go over the cheatsheet here.
Make sure you connect the accessory board as described here. You can download its schematic from the Design files.
Make sure to enable CONFIG_LKSS_DRIVERS_LAB2 and the related configs in the menuconfig before compiling a new exercise.
1. Simple character device (easy)
Description
Implement a simple character device driver that takes input from the user
through its device node /dev/simple_char and prints it to the kernel log
(see dmesg(1)). On read, return a custom message (“Hello from char driver!”).
Steps
Implement
my_readandmy_writecallbacks according toTODO 1, usingcopy_from_userandcopy_to_userto get the buffer from/to userspace.
Note
You can also print stuff in the my_open and my_release callbacks to observe the flow.
Implement
char_initandchar_exitcallbacks by printing a message usingprintk. Thechar_initmessage has to include the major of the device (You will use it later). Inchar_init, register the chardev using the implemented file operations.Build the module and boot the board
Hint
Use insmod(8) or modprobe(8) to load the kernel module
Now, if you look in
/dev, you won’t see the character device yet because the device node has not been created. To do that, use mknod(1) and the major you printed upon creating the module.To create a character device from userspace you can use:
mknod /dev/simple_char c <major> 0 # Here, 'c' stands for character device, and 0 is the minor.
To test if everything is working correctly, use the cat(1) and echo(1) commands as shown below. Do you notice how it gets stuck? Think about what
catand the kernel driver are doing and explain why.
Demo commands
$ echo "Hello!" > /dev/simple_char
[ 7170.769120] Hello from my_open!
[ 7170.772318] Recevied message: Hello!
[ 7170.772318]
[ 7170.777375] Goodbye from my_release!

$ cat /dev/simple_char
[ 7355.971330] Hello from my_open!
Hello from char driver!
[ 7356.481053] Goodbye from my_release!
2. Command a timer using a character device (medium)
Description
Control a timer by writing expiry times (in seconds) to an associated character device
(/dev/mytimer). Use a list to store the expiry times if the timer is
still pending. Upon expiry, the timer should continue to run using the next
value.
Steps
The input you give to the character driver is a string, and you need to convert it to an integer. Complete the
TODOinstring_to_int.
Hint
Look into include/linux/kstrtox.h. There are quite a few methods for converting strings to numbers in the kernel.
Observe the structures and macros used for the list:
LIST_HEAD,struct timer_list_entry,list_for_each_prev_safe, etc. Take a look into./include/linux/list.hand identify the methods used to insert and delete entries. Then, come back tomytimer.cand complete theTODOininsert_timeout,get_next_timeoutanddestroy_list.
Note
Think about the order in which you have to add the entries so that the list performs like a queue.
In
dev_write, get the message from the user and parse it. Check if the timer is still pending, and, if so, add the timeout to the list. If it is not pending, start it and save the time you started it. (Will use it later to tell how much time has elapsed).
Note
Observe how we can simply not populate the entry in fops and the kernel will know not to use it.
Next, implement the timer callback. Print the elapsed time in seconds. Then, extract the next entry from the list and start the timer if needed.
Hint
For the elapsed time, use the start time and the jiffies.
Look in
mytimer_initandmytimer_destroy. Here we initialize/destroy the timer and perform the misc device registration. Declarestruct miscdeviceand usemisc_registerto register it with the kernel andmisc_unregisterto unregister it.Build the module and boot the board
Write multiple values to
/dev/mytimerand observe. Keep in mind that these should be in seconds.
Demo commands
$ echo "6" > /dev/mytimer
$ echo "5" > /dev/mytimer
$ echo "4" > /dev/mytimer
$ echo "3" > /dev/mytimer
[ 9204.472920] Elapsed time 6s
[ 9209.592921] Elapsed time 5s
[ 9213.688920] Elapsed time 4s
[ 9216.760919] Elapsed time 3s

$ cat /dev/mytimer
cat: /dev/mytimer: Invalid argument
3. Command LEDs using GPIOs and character devices (medium)
Description
Use character devices to switch ON/OFF the 3 leds on the daughter board.
Control them via write/ioctl. You can try to also write the userspace program
that uses ioctl.
Steps
Note
Notice that this module’s structure differs from what we have been doing up until now. Instead of having init and exit functions, the module is declared using a platform driver. The platform driver contains probe and remove methods that have a Device Tree node associated.
Open
arch/arm64/boot/dts/freescale/imx93-11x11-frdm.dtsand search forbutton-led. Here are declared the GPIOs for the LEDs and buttons needed for this lab. Change the status fromdisabledtookayso that you can use it.
Note
Correlate the numbers of the GPIOs with the schematic.
Look into
gpio_led_probe. There is a third option for registering and creating character devices: Usingalloc_chrdev_regionwithcdev_initandcdev_add. This time we allocate 3 (leds) chrdevs and add them one by one. For getting thegpio_descassociated with each LED, usegpiod_get_index. Lastly, create device using the led_class, as in the previous exercises. Follow theTODOfor more info.You will need to get the device minor in the
read/writecallbacks in order to differentiate between leds. Explorestruct fileandstruct inodeand find how to get the chrdev associated with the file. Then, use MINOR(cdev->dev) to get the minor. Implement this inget_minor.In the file operations callbacks, use
gpiod_set_valueandgpiod_get_valueto interract with the previously probed GPIOs.
Hint
Use get_minor to get the index of the led in the led array.
Build the module and boot the board.
After implementing the
read/writecallbacks, you can implement theioctlcall as well. Don’t forget to enable it in the menuconfig!
Note
To test ioctl, you can write your own userspace app, cross-compile it and copy it to the rootfs using the lkss.py tool. Alternatively, you can download the binary from here.
Demo commands
$ echo "1" > /dev/green_led # Turn on green led
$ echo "1" > /dev/red_led   # Turn on red led
$ echo "0" > /dev/green_led # Turn off green led
$ echo "1" > /dev/blue_led  # Turn on blue led

$ ./test_ioctl 2 0          # Turn off blue led
$ ./test_ioctl 0 1          # Turn on red led
Useful resources
Footnotes