Introduction to the Linux Kernel
Slides: here
Theory
What is the Linux Kernel?
The Linux kernel is the core of the operating system. It sits between the hardware and the user-space applications and acts as a resource manager by abstracting the hardware and providing processes access to priviledged resources.
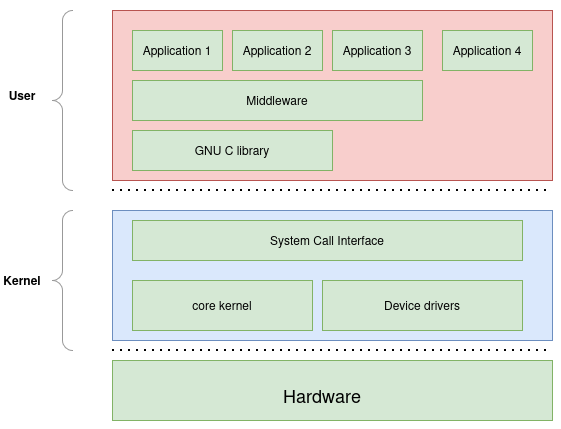
Figure 17 Linux kernel architecture overview
The Linux kernel provides the following core services:
System calls – the API that user-space programs use to interact with the kernel
Process management - scheduling, creation, termination of processes
Memory management - virtual memory, page allocation
Filesystem support - VFS layer, ext4, FAT, etc.
Networking stack - protocol stacks (TCP, UDP, IPv4/6), sockets API, etc.
The Linux kernel functionality can be extended through the use of Linux kernel modules which is kernel code that is dynamically loaded at runtime. The majority of Linux kernel modules are device drivers. A driver is a kernel level code used to allow applications to communicate with the underlying hardware devices such as sensors, storage controllers, USB devices, audio devices, etc.
The ARM64 arhitecture isolates software modules through the use of Exception Levels. There are four exception levels as described in the figure below:
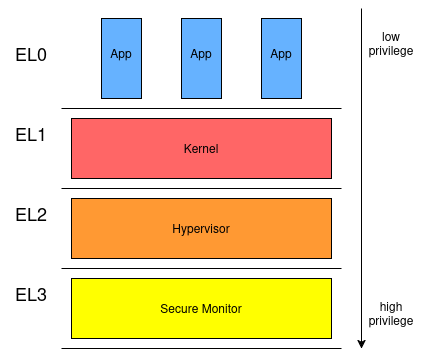
Figure 18 ARM64 exception levels
The kernel runs in a privileged CPU mode (EL1) while user applications run in unprivileged mode (EL0). This separation protects the system: a buggy userspace application cannot crash the kernel, but a buggy kernel module can.
The Linux source tree is organized into several top-level directories:
Directory |
Purpose |
|---|---|
|
Architecture-specific code ( |
|
Device drivers (there are tousands of them) |
|
Filesystem implementations |
|
Kernel header files |
|
Memory management |
|
Networking stack |
|
Core kernel subsystems (scheduler, timers, IRQs…) |
|
In-tree documentation |
Root Filesystem and Buildroot
The Linux kernel it is not useful running standalone, it needs a root filesystem (rootfs) to mount after boot. The rootfs provides:
The init system (
/sbin/initorbusybox init)System libraries (
libc,libm, …)Userspace tools (
ls,cat,insmod, …)Device nodes under
/dev
For embedded systems, Buildroot is a popular tool to generate a
minimal, cross-compiled rootfs together with a toolchain. In this summer school the rootfs
is pre-built for you and is provided as a rootfs.ext2.
The Kernel Image
When the kernel source is compiled for an ARM64 target, the build system produces a
file called Image located at arch/arm64/boot/Image. This is the executable
that the bootloader (U-Boot in our case) loads into RAM and jumps to at boot time.
A few things worth knowing about Image:
It is architecture-specific: the
Imagebuilt for ARM64 will not run on x86. This is why we need a cross-compiler (aarch64-linux-gnu-gcc) on the host.It is self-contained: the kernel code and built-in drivers (
=y) are all packed into this single file.Loadable modules (
.kofiles) are not part ofImage; they live on the rootfs and are loaded at runtime withinsmodormodprobecommands.
Kernel Modules
A kernel module (*.ko file) is a piece of kernel code that can be loaded and
unloaded at runtime after the kernel has started. This makes development much faster:
you write your driver, compile it as a module, copy it to the rootfs, and load it with
insmod or modprobe.
Every kernel module must define at minimum:
An init function called when the module is loaded (
module_init())An exit function called when the module is unloaded (
module_exit())License, author, and description metadata (
MODULE_LICENSE, etc.)
#include <linux/module.h>
#include <linux/init.h>

static int __init hello_init(void)
{
    printk(KERN_INFO "Hello, kernel!\n");
    return 0;
}

static void __exit hello_exit(void)
{
    pr_info("Goodbye, kernel!\n");
}

module_init(hello_init);
module_exit(hello_exit);

MODULE_LICENSE("GPL");
MODULE_AUTHOR("LKSS Student");
MODULE_DESCRIPTION("Hello World kernel module");
Key points:
__initand__exitare compiler hints that place the functions in special memory sections; the kernel frees the__initsection after boot.pr_info()is a shorthand forprintk(KERN_INFO ...). Output goes to the kernel log, visible viadmesgor the serial console.A module that returns a non-zero value from its init function fails to load.
Kconfig and Build Options
The Linux kernel build system uses Kconfig to manage thousands of compile-time options. For kernel modules, usually tristate option is used that can take one of three values:
n– excluded from the build entirelym– compiled as a loadable module (.kofile, loaded at runtime withinsmod)y– compiled directly into the kernelImage(built-in, always present at boot)
To keep the Linux kernel Image size small M is the recommended selection when building modules.
The menuconfig tool provides an interactive text menu to browse and change these
options:
$ scripts/lkss.py menuconfig
Selections are saved in repos/lkss-linux/.config. Lab drivers live under:
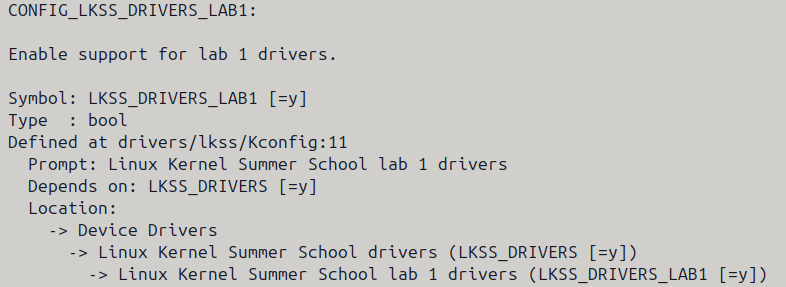
Figure 19 Linux kernel menuconfig entry
During development always build exercise modules as m. You can then use insmod or
modprobe to load the module. Switch to y only when you want the driver to be
present from the very first moment the kernel boots.
Kernel Logging
printk and pr_* macros
The kernel’s logging function is printk(). Unlike printf(), it prepends a
log level to the message string using a special prefix constant:
printk(KERN_INFO "Temperature: %d C\n", temp);
KERN_INFO is defined as the string "<6>", so the full call expands to
printk("<6>Temperature: %d C\n", temp). Because writing printk(KERN_*)
is verbose, the kernel provides shorter pr_* macros that are equivalent:
pr_info("Temperature: %d C\n", temp);   /* same as printk(KERN_INFO ...) */
pr_err("Sensor not found!\n");           /* same as printk(KERN_ERR ...)  */
pr_warn("Voltage is high: %d mV\n", v); /* same as printk(KERN_WARNING ...)*/
Log levels
Every message has a severity level, numbered from 0 (most urgent) to 7 (least urgent):
Level |
Constant |
Macro |
When to use |
|---|---|---|---|
0 |
|
|
System is unusable – imminent crash |
1 |
|
|
Action must be taken immediately |
2 |
|
|
Critical hardware or software failure |
3 |
|
|
Error: something went wrong but the system can continue |
4 |
|
|
Warning: unexpected but non-fatal condition |
5 |
|
|
Normal but significant event |
6 |
|
|
Informational messages (the most common level for drivers) |
7 |
|
|
Debug messages – silent by default |
dmesg vs the serial console
All printk() messages go to the kernel ring buffer: a fixed-size circular
buffer in memory. The dmesg command dumps the entire ring buffer to the standard output.
The serial console (the output you see in minicom) behaves differently. It only displays
messages whose log level number is strictly less than the console loglevel.
This acts as a filter: lower level numbers mean more urgent messages, so only urgent
messages cross the threshold and appear in real time.
Note
A message at level 6 (KERN_INFO) reaches the console only when the console
loglevel is set to 7 or higher.
Read the current loglevel settings from /proc/sys/kernel/printk:
cat /proc/sys/kernel/printk
Example output:
7    4    1    7
^    ^    ^    ^
|    |    |    |-----  default console loglevel at boot
|    |    |----------  minimum console loglevel (lowest value to which console log level may be set)
|    |---------------  default message loglevel (used when no level prefix given to printk)
|--------------------  current console loglevel
With the current console loglevel set to 7, messages at levels 0-6 appear on the
serial console in real time. Messages at level 7 (pr_debug) are filtered out.
Change the console loglevel at runtime:
# Show only KERN_ERR (level 3) and above on the console
echo 4 > /proc/sys/kernel/printk

# Show everything, including pr_debug (level 7)
echo 8 > /proc/sys/kernel/printk
Linux Kernel API
Execution Contexts
Code that runs inside the Linux kernel can be found in the following two contexts:
Process context – code that runs on behalf of a user-space process (e.g. system call). The scheduler can preempt this code and it is allowed to sleep.
Interrupt context (also called atomic context) – code that runs inside a hardware interrupt handler, a timer callback, or while a spinlock is held. The scheduler cannot switch tasks here and no sleeping operations are permitted.
Memory Allocation: kmalloc
kmalloc() is the kernel equivalent of malloc(). It allocates physically
contiguous memory and returns a kernel virtual address, or NULL on failure.
#include <linux/slab.h>

void *ptr = kmalloc(size, flags);
/* ... use ptr ... */
kfree(ptr);
The flags argument controls allocator behaviour when memory is scarce:
Flag |
When to use |
|---|---|
|
Process context only. The allocator may sleep to reclaim memory.
Use this by default in |
|
Interrupt / atomic context. The allocator never sleeps; returns
|
Always check the return value:
struct my_data *data = kmalloc(sizeof(*data), GFP_KERNEL);
if (!data)
    return -ENOMEM;
Kernel Timers
A kernel timer schedules a callback to run once after a specified delay. The callback runs in interrupt context and must not sleep.
#include <linux/timer.h>

struct timer_list my_timer;

static void my_callback(struct timer_list *t)
{
    pr_info("Timer fired!\n");
    mod_timer(t, jiffies + HZ);   /* re-arm for another second */
}

/* In init/probe */
timer_setup(&my_timer, my_callback, 0);
mod_timer(&my_timer, jiffies + HZ);   /* fire after 1 second */

/* In exit/remove */
timer_delete_sync(&my_timer);   /* waits for any running callback to finish */
jiffies is the kernel tick counter. HZ is the number of ticks per second
so jiffies + HZ means “one second from now”.
Spinlocks and Mutexes
Shared data accessed from more than one context must be protected by a lock.
Spinlock – the waiting CPU busy-loops until the lock is free. Safe in both process and interrupt context. A thread holding a spinlock must not sleep.
#include <linux/spinlock.h>

spinlock_t my_lock;
spin_lock_init(&my_lock);

/* Process context */
spin_lock(&my_lock);
/* ... critical section ... */
spin_unlock(&my_lock);

/* When one accessor is an interrupt handler, save/restore IRQ state */
unsigned long flags;
spin_lock_irqsave(&my_lock, flags);
/* ... critical section ... */
spin_unlock_irqrestore(&my_lock, flags);
Mutex – a sleeping lock; the waiting task is put to sleep until the mutex becomes available. Use mutexes when all accesses happen in process context.
#include <linux/mutex.h>

struct mutex my_mutex;
mutex_init(&my_mutex);

mutex_lock(&my_mutex);
/* ... critical section ... */
mutex_unlock(&my_mutex);
The Device Tree (DTS/DTB)
ARM-based SoCs like the i.MX93 do not support hardware auto-discovery. Unlike a PC where
the BIOS can enumerate PCI devices, an embedded SoC has no standard way for software to
scan and find what peripherals are soldered on the board. Instead, the board description
is written by hand in a Device Tree Source (*.dts) text file, compiled into a
binary Device Tree Blob (*.dtb), and passed by the bootloader (U-Boot) to the
kernel at boot time. The kernel parses the blob and uses it to know what hardware exists,
where it lives in memory, and which driver should handle it.
What is a device tree node?
A device tree is a tree of nodes, where each node represents one piece of hardware
(or a logical grouping of hardware). Nodes are enclosed in { } and can be nested.
The root of the tree is /:
/ {
    cpus {
        cpu@0 { /* ... */ };
    };

    memory@80000000 {
        /* ... */
    };

    soc {
        uart1: serial@30880000 {
            /* ... */
        };
    };
};
A node name has the form name@unit-address where unit-address is typically
the base address of the device’s registers in hexadecimal. The @address suffix
is optional for nodes that have no registers (like cpus).
A node can also be given a label (uart1: in the example above) so that other
nodes can reference it later using &uart1.
What is a property?
Inside a node, properties are key-value pairs that describe the device.
They follow the syntax property-name = value;. Values come in several types:
node {
    /* String */
    compatible = "vendor,model";

    /* 32-bit integers in angle brackets */
    reg = <0x30880000 0x10000>;   /* one cell = one 32-bit value */

    /* Multiple cells – a list of integers */
    gpios = <&gpio2 4 0>, <&gpio2 14 0>;

    /* Boolean – the property exists or it doesn't */
    big-endian;

    /* Phandle – a reference to another node */
    clocks = <&clk IMX93_CLK_UART1_GATE>;

    status = "okay";
};
The most important properties:
compatible– a list of strings (most specific first) that the kernel matches against driver tables. For example"fsl,imx93-uart", "fsl,imx8ulp-lpuart"lets the kernel try the i.MX93-specific driver first and fall back to the generic one.reg– the physical address and size of the device’s memory-mapped registers. Most peripheral nodes have this.status–"okay"enables the device;"disabled"(the default for many nodes) tells the kernel to skip it. Changing a node fromdisabledtookayin the board DTS file is the standard way to activate an optional peripheral.
Navigating device tree on the board at runtime
The kernel exposes the parsed device tree under /sys/firmware/devicetree/base/.
You can browse it like a directory:
ls /sys/firmware/devicetree/base/
ls /sys/firmware/devicetree/base/soc@0/
cat /sys/firmware/devicetree/base/compatible
Each property is a file; each child node is a directory.
The lkss-bus
Lab exercises add device nodes under a virtual container node called lkss-bus
with compatible = "simple-bus". The kernel treats simple-bus as a transparent
container and probes all its child nodes automatically. It is defined in
arch/arm64/boot/dts/freescale/imx93-11x11-frdm.dts:
lkss-bus {
    compatible = "simple-bus";

    my-sensor {
        compatible = "lkss,lab1-sensor";
        label = "temperature-sensor";
        sample-rate-hz = <100>;
        max-temp-celsius = <85>;
        status = "okay";
    };
};
When you add a new child node inside lkss-bus and rebuild the DTB, the kernel
will try to find a driver whose compatible string matches your node.
Platform Drivers
A platform driver is a driver that binds to a device described in the device tree.
The kernel matches the compatible string of a device tree node against the driver’s
of_device_id table and calls the driver’s probe() function when a match is found.
This is how the vast majority of embedded drivers work.
A minimal platform driver looks like this:
#include <linux/module.h>
#include <linux/platform_device.h>
#include <linux/of.h>

static int my_probe(struct platform_device *pdev)
{
    dev_info(&pdev->dev, "Device matched and probed!\n");
    return 0;   /* 0 = succes, negative on error */
}

static void my_remove(struct platform_device *pdev)
{
    dev_info(&pdev->dev, "Device removed\n");
}

static const struct of_device_id my_dt_ids[] = {
    { .compatible = "lkss,mydevice" },
    { /* sentinel – marks end of table */ },
};

static struct platform_driver my_driver = {
    .probe  = my_probe,
    .remove = my_remove,
    .driver = {
        .name           = "my_driver",
        .of_match_table = my_dt_ids,
    },
};

module_platform_driver(my_driver);
MODULE_LICENSE("GPL");
Key points:
probe()is called when the kernel finds a device tree node whosecompatiblematches an entry inof_device_id.remove()is called when the module is unloaded.module_platform_driver()is a helper macro that expands to themodule_init/module_exitpair that registers and unregisters the driver.dev_info()/dev_err()are device-aware variants ofpr_info()/pr_err()that automatically prefix the message with the device name, making logs easier to filter. Prefer them overpr_*whenever astruct device *is available:dev_info(&pdev->dev, "probe ok, base_addr=0x%08x\n", addr); dev_err(&pdev->dev, "failed to read register: %d\n", ret);
Reading device tree properties inside probe():
static int my_probe(struct platform_device *pdev)
{
    struct device_node *np = pdev->dev.of_node;
    u32 my_value;
    const char *label;
    int ret;

    ret = of_property_read_u32(np, "my-value", &my_value);
    if (ret)
        dev_warn(&pdev->dev, "my-value not found, using default\n");
    else
        dev_info(&pdev->dev, "my-value = %u\n", my_value);

    ret = of_property_read_string(np, "label", &label);
    if (!ret)
        dev_info(&pdev->dev, "label = %s\n", label);

    return 0;
}
pdev->dev.of_node is a pointer to the device’s node in the parsed device tree.
Common helpers for reading properties:
Function |
Purpose |
|---|---|
|
Read a single 32-bit unsigned integer |
|
Read a string |
|
Return |
|
Read an array of 32-bit integers |
Lab Exercises
Note
The lab source code lives in the Linux kernel tree under
repos/lkss-linux/drivers/lkss/lab1/.
Before each test cycle the workflow is:
Edit/write your driver in
repos/lkss-linux/drivers/lkss/lab1/Select config option to build your code as a module
M$ ./scripts/lkss.py menuconfigCompile the module and copy them to rootfs
$ ./scripts/lkss.py compile --install-modulesIn a separate terminal open the serial console
$ minicom -D /dev/ttyACM0Boot the board
$ ./scripts/lkss.py bootLoad the module and observe
$ modprobe your_module.koUnload the module (if requested)
$ rmmod your_module.ko
1. Anatomy of a Hello World Module
1.1 Explore the source
Open repos/lkss-linux/drivers/lkss/lab1/ex1/hello.c and read through it carefully.
Make sure you understand the following points before moving on:
The init function is registered with
module_init()and called by the kernel when you runinsmod. It must return0on success or a negative errno value on failure (e.g.-ENOMEM) in which case the module is not loaded.The exit function is registered with
module_exit()and called when you runrmmod. Its job is to undo everything the init function did (e.g free resources).__initand__exitare compiler hints. The linker places__initfunctions in a special section that the kernel frees from memory after boot, saving RAM.__exitfunctions are discarded entirely when the driver is compiled as built-in (=y), because they can never be called.MODULE_LICENSE("GPL")is mandatory. Without it the kernel marks itself as tainted and GPL marked functions are not available.
1.2 Enable the module in Kconfig
Before building, you need to tell the kernel build system to compile the lab1 modules.
Open menuconfig:
python3 scripts/lkss.py menuconfig
Navigate to:
Device Drivers  --->
  Linux Kernel Summer School Drivers  --->
    [M] LKSS Lab 1 drivers
Press M to select the module (M = build as loadable module). Save and exit.
1.3 Compile the modules
# Using lkss.py  build kernel + all modules, then install modules into rootfs
python3 scripts/lkss.py compile -j$(nproc) --install-modules
1.4 Boot the board and load the module
python3 scripts/lkss.py boot
On the board’s serial console:
# Load the module
insmod hello.ko OR modprobe hello.ko
# why does insmod doesn't work? Find a solution and load the module using both commands above

# Inspect the kernel log
dmesg | tail -5
You should see something like:
[ 12.345678] Hello, kernel!
1.5 Unload the module
rmmod hello
dmesg | tail -5
Verify the exit message appears.
2. Printing from the Kernel
2.1 Modify hello.c
Edit repos/lkss-linux/drivers/lkss/lab1/ex1/hello.c. Add one pr_* call at each
severity level inside hello_init(). For example:
pr_emerg("This is EMERG level\n");
pr_err("This is ERR level\n");
pr_warn("This is WARNING level\n");
pr_info("This is INFO level\n");
pr_debug("This is DEBUG level\n");
Rebuild the module, copy it to the rootfs, boot, and load it:
# On host – rebuild and install
python3 scripts/lkss.py compile -j$(nproc) --install-modules
python3 scripts/lkss.py boot

# On board – load and inspect
modprobe hello.ko
# Show all messages with their numeric log level
dmesg

# Filter by log level (show only warnings and above)
dmesg -l warn,err,crit,alert,emerg
2.2 Dynamic debug
pr_debug() is silent by default. Enable it for your module at runtime:
echo "module hello +p" > /sys/kernel/debug/dynamic_debug/control
rmmod hello
insmod hello.ko
dmesg | tail
3. Kernel Log Levels
3.1 Read the current loglevel settings
On the board’s serial console, run:
cat /proc/sys/kernel/printk
Note the four numbers. The first is the current console loglevel. With the default
value of 7, all messages at levels 0–6 appear on the serial console.
3.2 Print at every log level
Make sure the module from Exercise 2 is compiled with one pr_* call at every level
(see Exercise 2.1). Load it and watch the serial console and dmesg side by side.
On the board:
modprobe hello.ko
Observe that all messages appear in dmesg. Note which ones appear on the serial
console.
3.3 Lower the console loglevel
Lower the console loglevel so that only errors and above reach the serial console:
echo 4 > /proc/sys/kernel/printk
Now unload and reload the module:
rmmod hello
modprobe hello.ko
Watch the serial console. You should see only pr_emerg, pr_alert,
pr_crit, and pr_err messages (levels 0–3).
Now check dmesg:
dmesg | tail -10
All messages are still in the ring buffer and dmesg is unaffected by the console
loglevel.
3.4 Raise the console loglevel to show everything
echo 8 > /proc/sys/kernel/printk
Reload the module again and confirm that pr_debug() output now appears on the
serial console:
rmmod hello
modprobe hello.ko
Note
pr_debug() is compiled out unless CONFIG_DYNAMIC_DEBUG is enabled or the
source file defines DEBUG before including <linux/printk.h>. If you do not
see the debug message even at loglevel 8, enable dynamic debug:
echo "module hello +p" > /sys/kernel/debug/dynamic_debug/control
3.5 Restore the default loglevel
echo 7 > /proc/sys/kernel/printk
4. Kernel Oops
4.1 Explore the source
Open repos/lkss-linux/drivers/lkss/lab1/ex4/oops.c. The module dereferences a NULL
pointer inside its init function, which will trigger a kernel oops.
4.2 Enable and build
Enable CONFIG_LKSS_LAB1_OOPS in menuconfig:
python3 scripts/lkss.py menuconfig
4.3 Load the module
On the board’s serial console:
modprobe oops.ko
Watch the serial console. You will see output similar to:
[   15.123456] Unable to handle kernel NULL pointer dereference at virtual address 0000000000000000
[   15.123456] Mem abort info:
[   15.123456]   ESR = 0x0000000096000004
[   15.123456]   EC = 0x25: DABT (current EL), IL = 32 bits
...
[   15.123456] Call trace:
[   15.123456]  oops_init+0x1c/0x30 [oops]
[   15.123456]  do_one_initcall+0x54/0x1d0
...
[   15.123456] ---[ end trace ]---
4.4 Analyze the oops
Find and understand each part of the oops output:
The faulting address – the virtual address the kernel tried to access. For a NULL dereference it will be
0x0000000000000000(or a small offset from it if the code accessed a struct member through a NULL pointer).The call trace – the chain of function calls that led to the crash, innermost first. You will see
oops_initnear the top, followed by the kernel’s own module-loading machinery (do_one_initcall, etc.). This is the primary tool for locating the faulty line of code.
An oops is a recoverable fault, the kernel kills the offending process (or in our case, aborts the module load) and tries to continue. When the error is unrecoverable the oops becomes a
kernel panic.
5. Linux Kernel API in Practice
5.1 Explore the skeleton
Open repos/lkss-linux/drivers/lkss/lab1/ex5/api_demo.c. Locate every TODO
comment – these are the points where you add code.
The file declares:
struct api_demo– holds a counter (u32 count) and a timer (struct timer_list timer)g_demo– a global pointer to the dynamically allocated instancecounter_lock– a spinlock that protectsg_demo->count
5.2 Allocate the data structure (TODO 5.2)
In api_demo_init(), allocate sizeof(struct api_demo) bytes with kmalloc().
Choose the GFP flag appropriate for a module init function. Return -ENOMEM
if the allocation fails.
Print the allocated size with pr_info() so you can verify it in dmesg.
5.3 Set up and arm the timer (TODO 5.3)
Still in api_demo_init(), call timer_setup() to bind the timer to the
tick_callback() function already declared in the skeleton. Then call
mod_timer() to schedule the first tick one second from now (jiffies + HZ).
5.4 Implement the timer callback (TODO 5.4)
Inside tick_callback():
Acquire
counter_lockwith the spinlock variant appropriate for interrupt context (hint:spin_lock_irqsave).Increment
g_demo->count.Release the lock (
spin_unlock_irqrestore).Print the current counter value with
pr_info().Re-arm the timer for another one-second tick.
5.5 Clean up on unload (TODO 5.5)
In api_demo_exit():
Stop the timer with
timer_delete_sync()before touching the memory the callback uses – this guarantees no callback runs after this point.Free
g_demowithkfree().
5.6 Build and test
Enable CONFIG_LKSS_LAB1_EX5 in menuconfig, then build and load:
# Host
python3 scripts/lkss.py compile -j$(nproc) --install-modules
python3 scripts/lkss.py boot

# Board
modprobe api_demo
dmesg -w
You should see a new message every second:
[   20.000000] api_demo: allocated 32 bytes
[   21.000000] api_demo: tick! count = 1
[   22.000000] api_demo: tick! count = 2
[   23.000000] api_demo: tick! count = 3
Unload the module and confirm the timer stops:
rmmod api_demo
6. Your First Platform Driver on the lkss-bus
6.1 Add a device tree node
Edit the board device tree: repos/lkss-linux/arch/arm64/boot/dts/freescale/imx93-11x11-frdm.dts
Inside the lkss-bus node add a new child node:
lkss-bus {
    compatible = "simple-bus";

    my-sensor {
        compatible = "lkss,lab1-sensor";
        label = "temperature-sensor";
        sample-rate-hz = <100>;
        max-temp-celsius = <85>;
        status = "okay";
    };
};
6.2 Write the platform driver
Open repos/lkss-linux/drivers/lkss/lab1/ex6/platform_sensor.c and complete
the TODOs one at a time. After each step rebuild the module, copy it to the
board, and load it to verify the output before moving on.
6.2a Read the label string (TODO 6.2a)
Inside sensor_probe(), declare a const char *label variable and call
of_property_read_string() to read the "label" property from the device
tree node. Print the result with dev_info():
Expected output after loading the module:
lkss_sensor my-sensor: sensor probed!
lkss_sensor my-sensor: label: temperature-sensor
6.2b Read the sample rate (Follow TODO 6.2b)
Still inside sensor_probe(), declare a u32 rate variable and call
of_property_read_u32() to read the "sample-rate-hz" property. Print it.
Expected additional output:
lkss_sensor my-sensor: sample rate: 100 Hz
6.2c Read the maximum temperature (Follow TODO 6.2c)
Add a u32 max_temp variable and read the "max-temp-celsius" property
the same way. Print it.
Expected additional output:
lkss_sensor my-sensor: max temperature: 85 C
6.2d. Log sensor removal (Follow TODO 6.2d)
In sensor_remove(), add a dev_info() call so that unloading the module
produces a visible message:
static void sensor_remove(struct platform_device *pdev)
{
    dev_info(&pdev->dev, "sensor removed\n");
}
Rebuild, load the module, then unload it with rmmod platform_sensor and
confirm you see:
lkss_sensor my-sensor: sensor removed
6.6. Add a num-channels property
This step combines a device tree edit with a driver change.
6.6a. Update the device tree node
Edit the board device tree: repos/lkss-linux/arch/arm64/boot/dts/freescale/imx93-11x11-frdm.dts
Add num-channels = <4>; to the my-sensor node.
6.6b Read the property in the driver (Follow TODO 6.6)
Back in sensor_probe(), add a u32 num_channels variable and call
of_property_read_u32() to read "num-channels", then print it:
6.6c Rebuild and verify
Rebuild the kernel with the updated DTB and the updated module:
python3 scripts/lkss.py compile -j$(nproc) --install-modules
python3 scripts/lkss.py boot
On the board:
modprobe platform_sensor
dmesg | tail -10
You should now see:
lkss_sensor my-sensor: sensor probed!
lkss_sensor my-sensor: label: temperature-sensor
lkss_sensor my-sensor: sample rate: 100 Hz
lkss_sensor my-sensor: max temperature: 85 C
lkss_sensor my-sensor: num channels: 4